What is a Screenplay?
A screenplay is a document designed to tell a visual story, and to be used as a blueprint for production. Every film and TV show begins with a screenplay: it’s where the concept, story, characters and scenes all originate, and it’s how they’re first presented to people working within the film and television industry.
Screenplay Formatting
How does a screenplay differ from a typical text or Word document?
A screenplay is formatted in a specific way and has an intricate and unique alignment.
The film and television industry is just that: an industry. This is why feature and television scripts have to follow specific formatting. Unlike novel writing, which is primarily a solitary creative pursuit, writing a screenplay will ideally involve other people at some point as film and television production are collaborative art forms. At both the development and production stages, various industry professionals need to read the script, and understand what they’re reading.
In addition, producers, financiers and studio execs will need to read the script and be able to figure out how much money it’s going to cost them to make, and how long it will take to shoot. This is one of the main reasons for the “one page = one minute” rule that industry standard formatting makes possible: each page of a screenplay should represent one minute of screen time. If this formatting isn’t followed, it will be impossible for a studio, producer or production company to break down your script and assess the schedule and budget required, which will hinder your chances of getting your project made.
Whether it’s a movie, TV show, or even a scripted YouTube video, the blueprint document needs to be properly formatted or else you’ll be building your story on a shaky foundation.
You’ll also limit your screenplay’s reach if it’s not formatted to industry standards. From managers to agents to script readers, everyone you’ll be submitting your script to is likely to reject it if it’s not formatted correctly (regardless of how great your concept or story might be). In fact, screenplay contest readers are often advised to disqualify scripts that aren’t properly formatted.
Because of all these reasons, every screenwriter should adhere to industry standard formatting.
Why Screenwriting Software Matters
It is extremely time-consuming and difficult to attempt to manually format your screenplay within a text or Word document. You’d have to constantly change the formatting for each individual line of your script, and it’ll likely deplete your creative energy. These formatting rules aren’t arbitrary; they ensure clarity, readability, and efficient communication of cinematic storytelling. From scene headings and action lines to dialogue and parentheticals, each element has a precise placement and purpose. It is impossible to get every element looking exactly right within a blank text or Word document, and it will be obvious to the industry professional you are submitting your script to that it was not written with screenwriting software.
Scripts use Screenplay Elements, and these aren’t available in typical word processing software. Final Draft is the most popular screenwriting software used by the film and television industry, and it automatically formats your screenplay to industry standards. With built-in tools for screenplay elements, pagination, and even revision tracking, professional software removes the burden of technical compliance and ensures your script meets expectations from page one.
Every screenplay is made up of “elements” like Action and Dialogue that are formatted in a specific way. Learning to use these screenplay elements is fundamental to writing a well-formatted script.
What Are Screenplay Elements?
Screenplay elements are the foundation of a screenplay. They are the building blocks of your story, and help industry professionals visualize the movie or TV show you have written.

The six major screenplay elements are:
Scene Headings
A screenplay is comprised of a number of different scenes, and every scene starts with a Scene Heading (also known as a ‘slug line’).
A Scene Heading gives the reader the following information:
- Whether the scene takes place inside (INT., short for interior) or outside (EXT., short for exterior).
- The location where the scene takes place (a house, the beach, a cafe, etc.).
- What time of day it is (day, night, morning, afternoon, etc.).
For example:

This Scene Heading tells us that the scene is taking place outside, that we are at the character Kevin’s house, and the scene takes place during the day.
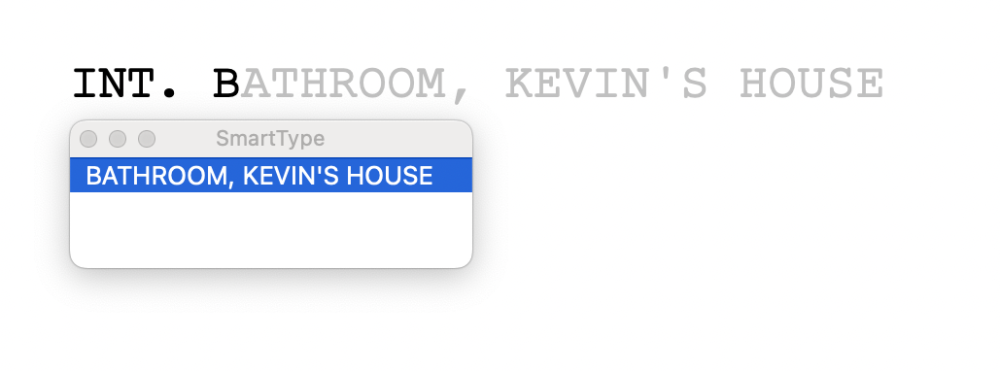
It’s good to be specific with your Scene Headings, so the reader knows exactly where they are placed in the story. If it’s an interior location, include the room where the scene is taking place. Simply add the room to the Scene Heading followed by a comma. Always list the (micro) exact location before the (macro) greater location:

This Scene Heading tells us that we’re in the bathroom in Kevin’s house, and it’s morning.
If using Final Draft, simply typing “IN” or “EX” will automatically prompt you to select INT. or EXT.

Once you’ve created a location in a Scene Heading, it’ll be saved in your Final Draft file, and the option will automatically appear by simply typing INT. or EXT. and the first letter of the location:
Time of day options will also appear automatically at the end of a formatted Scene Heading:

Action
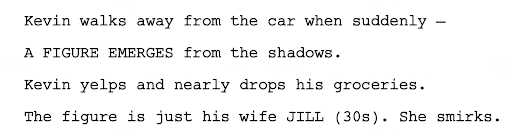
A Scene Heading in a screenplay is typically followed by action. This is where you describe what the audience is seeing:

Note that Kevin’s BAG OF GROCERIES is written in ALL CAPS. This is a technique you can use to highlight important props, sounds and character movements in your scenes. This technique should be used sparingly as too much capitalization means aspects of the script you want to highlight for importance may be lost.
These days, the shorter and more concise you can be in your action lines, the better. Try not to exceed five lines worth of description, and break up anything thrilling or exciting (“action shots”) on the page to create a more cinematic read:
Character
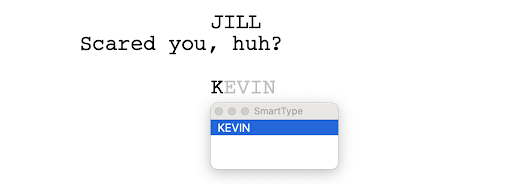
When you want a Character to speak in your script, you must signify that they are speaking by adding the Character’s name above their dialogue. When using Final Draft, selecting the Character element formats your text to be properly aligned over the character’s dialogue. This is called a character cue:

After you create a Character element, it’s stored and will reappear if you start typing out the name (if you’ve selected the Character element). You can also simply press Command/Control +3 and the cursor will automatically move to the right place and open a character list once you start typing:
Dialogue
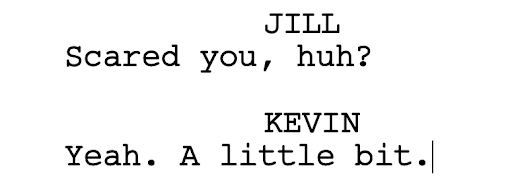
If action tells you what’s happening in the scene, dialogue indicates what each character is saying.
Final Draft properly formats dialogue by selecting “Dialogue” from the Format menu, pressing Command/Control + 5 or simply inserting a character cue, which automatically moves the cursor and creates dialogue lines beneath:
Parenthetical
Parenthetical direction is a dialogue element you should use sparingly. This is text inside of parentheses underneath the character cue. It tells the actor how the dialogue should be delivered (something many trained actors frown upon), but it also helps signify to a reader where a character is emotionally if it’s difficult to do another way. It can also illustrate who the character is talking to if this is unclear:
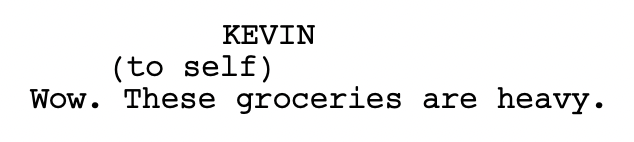
In Final Draft you can add a Parenthetical element to a character’s dialogue by selecting from the Elements menu or by simply pressing the Tab key when on the character cue.
A parenthetical can also be used beside the character cue in very specific circumstances: if your character is speaking OFF SCREEN (O.S.) or as a VOICE OVER (V.O.):

Transitions
These days you don’t need to include a transition between scenes. It’s understood that one scene will be edited to naturally flow into the next scene. As such, common transitions like CUT TO are considered old-fashioned and a waste of page space. In a sense, your SCENE HEADING acts as “the cut.”
However, sometimes you might want to use a specific transition as a stylistic choice, such as a SMASH CUT or FADE TO BLACK. Final Draft has many different transition options:

So now we’ve gone through the elements that make up a script. Keep using those elements correctly for 90 to 120 pages and you will have succeeded in writing your screenplay!
Final Draft Script Templates
A template is a reusable document that contains all of the above screenplay elements and proper formatting.
A number of script and TV templates are included with Final Draft. To open a template, go to File > New from Template and choose one from the category you want:
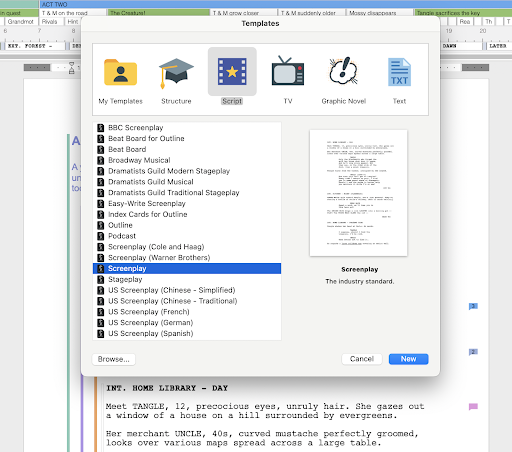
A new, untitled document of that template will open. It may or may not have text. If it does, read it to familiarize yourself with how writing that kind of script is usually done. Afterward you can delete the text by pressing the Control + A keys (Windows) or the Command + A keys (Mac) and then the Delete or Backspace key.
Script Examples to Review
Before writing your script, you should read produced screenplays (both old and new) to see how other writers use these elements, and to get a handle on formatting.
One of the best sites to download produced screenplays from is Script Slug. From classics like Psycho to contemporary hits like Deadpool, Script Slug has a massive library of scripts that are downloadable.
Try to reproduce a scene from a produced screenplay into a new Final Draft Screenplay template, using the Elements in the same way you see on the page to get familiar with them.
Of course you can just sit down and start typing your script, but finding your story and brainstorming ideas can be a great way to fall in love with your idea and punch through some early roadblocks. You can learn how to do that in our second lesson.